| Chapter 2. HTML Files | ||
|---|---|---|
   | ||
| Chapter 2. HTML Files | ||
|---|---|---|
| ||
Table of Contents
The XOOPS default theme contains 6 HTML files: theme.html, theme_blockleft.html, theme_blockcenter_c.html, theme_blockcenter_l.html, theme_blockcenter_r.html and theme_blockright.html.
Each file will be discussed in detail.
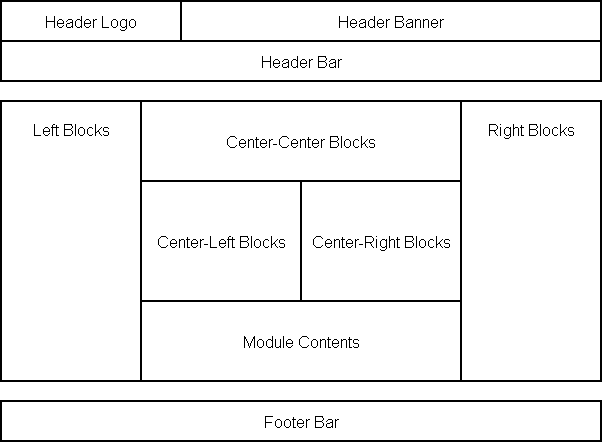
Undoubtedly, the theme.html is the most important HTML file in all XOOPS themes. This file dictates the overall design, structure and layout of your site.
Below is a diagrammatic representation of the basic layout of the theme.html of the Default theme. It has 3 main tables for the header, content and footer and 1 nested table for the center blocks. Take note that there are actually no spaces in between the tables once displayed on the browser.
With a basic understanding of HTML, it is possible to manipulate the Header table, the Content table and the Footer table independent from each other.
Line 1-2:
<!DOCTYPE html PUBLIC "-//W3C//DTD XHTML 1.0 Transitional//EN"
"http://www.w3.org/TR/xhtml1/DTD/xhtml1-transitional.dtd">
<html xmlns="http://www.w3.org/1999/xhtml"
xml:lang="<{$xoops_langcode}><meta http-equiv="Content-Type"
content="text/html; charset=iso-8859-1">" lang="<{$xoops_langcode}>">
Each HTML document should have a Document Type Definition. XOOPS themes adhere to XHTML 1.0 Transitional. XHTML is a family of current and future document types and modules that reproduce, subset, and extend HTML 4
![[Tip]](img/admon/tip.png) | Theme-Building Tips |
|---|---|
| |
Line 3-12:
<head>
<meta http-equiv="content-type" content="text/html;
charset=<{$xoops_charset}>" />
<meta http-equiv="content-language" content="<{$xoops_langcode}>" />
<meta name="robots" content="<{$xoops_meta_robots}>" />
<meta name="keywords" content="<{$xoops_meta_keywords}>" />
<meta name="description" content="<{$xoops_meta_description}>" />
<meta name="rating" content="<{$xoops_meta_rating}>" />
<meta name="author" content="<{$xoops_meta_author}>" />
<meta name="copyright" content="<{$xoops_meta_copyright}>" />
<meta name="generator" content="XOOPS" />
The Meta tags form the first part of the head of the HTML and are mostly generated from Smarty tags. It should not be edited directly within the theme.html file. Meta information should be changed from the System Admin > Preferences > Meta Tags and Footer.
| Theme-Building Tips |
|---|---|
| |
Line 13:
<title><{$xoops_sitename}> - <{$xoops_pagetitle}></title>There are 2 Smarty tags in the title:
<{$xoops_sitename}> - This is the Site name entered in the System Admin > Preferences > General Settings. This Smarty tag can be used anywhere in the theme.html or template files where the name of the site is needed.
<{$xoops_pagetitle}> - This is a dynamically derived Smarty tag that will change as the page changes. The default content of the Smarty tag is the Site Slogan from System Admin > Preferences > General Settings. If a module is specified as the front page, or when browsing the site within a module, the module name will be used and displayed instead of the Site Slogan.
| Theme-Building Tips |
|---|---|
| |
Line 14-18:
<link href="<{$xoops_url}>/favicon.ico" rel="SHORTCUT ICON" />
<link rel="stylesheet" type="text/css" media="all"
href="<{$xoops_url}>/xoops.css" />
<link rel="stylesheet" type="text/css" media="all"
href="<{$xoops_themecss}>" />
<!-- RMV: added module header -->
<{$xoops_module_header}>
This is the part where the favicon.ico and Cascading Style Sheets are linked. This is the first instance where the important <{$xoops_url}> Smarty tag is used.
<{$xoops_url}> - This is the site URL as defined in the mainfile.php. This Smarty tag can be used anywhere in the theme.html or template files where the site URL is needed.
<{$xoops_themecss}> - This Smarty tag defines the location of the specific style.css of the theme chosen as default. It has little use within the body part of the theme.html.
| Theme-Building Tips |
|---|---|
| |
Line 19-23:
<script type="text/javascript">
<!--
<{$xoops_js}>
//-->
</script>
</head>
This part loads the XOOPS JavaScript functions.
Line 24-34:
<body>
  <table cellspacing="0">
    <tr id="header">
      <td id="headerlogo"><a href="<{$xoops_url}>/"><img
src="<{$xoops_imageurl}>logo.gif" width="150" height="80" alt="" /></a></td>
      <td id="headerbanner"><{$xoops_banner}></td>
    </tr>
    <tr>
      <td id="headerbar" colspan="2"> </td>
    </tr>
  </table>
The header table forms the first part of the body of the HTML. It contains the site logo, space for banners and the image bar separating the header from the content. The formatting of the table and each table cell is handled by the style.css of the default theme.
Aside from <{$xoops_url}>, two Smarty tags are found:
<{$xoops_imageurl}> - This Smarty tag represents the path to your default theme directory, e.g. http://www.yoursite.com/theme/default/. This Smarty tag can be used anywhere in the theme.html or template files where the path to the theme directory is needed.
<$xoops_banner}> - This Smarty tag retrieves the banners from System Admin > Banners
| Theme-Building Tips |
|---|---|
| |
Line 36-45:
<table cellspacing="0">
    <tr>
      <td id="leftcolumn">
        <!-- Start left blocks loop -->
        <{foreach item=block from=$xoops_lblocks}>
          <{include file="default/theme_blockleft.html"}>
        <{/foreach}>
        <!-- End left blocks loop -->

      </td>
This piece of code starts the all-important Content Table. This is where all block and module contents are displayed. The Content Table tag opens at Line 36 and closes at Line 106. There are many codes in between that will dictate the look of the site.
The Content Table has only 1 row with 3 cells. The first cell contains the left column contents. The layout is controlled by the style.css using the id “leftcolumn”.
Within that table cell are Smarty tags that calls a loop and displays the different blocks for the Left Column. The layout and structue of each left column block is handled by the theme_blockleft.html file and the style.css.
Specific details on the left column blocks is provided in the theme_blockleft.html section.
| Theme-Building Tips |
|---|---|
| |
Line 47-50:
<td id="centercolumn">

        <!-- Display center blocks if any -->
        <{if $xoops_showcblock == 1}>
The second cell within the Content Table is the Center Column. The layout and format settings are controlled by the style.css using the id “centercolumn”.
The Smarty tag <{if $xoops_showcblock == 1}> checks if there are center blocks to be displayed. If there are, the HTML and Smarty code in between the conditionals will be called, i.e. the center blocks will be be displayed.
Line 85:
<{/if}>
        <!-- End display center blocks -->
The <{if}> Smarty tag is closed at Line 85 with an <{/if}> Smarty tag. This part ends all calls made to the different center blocks.
Remember that there are 3 types of center blocks: center-center, center-left and center-right. Specific details on these types are provided below.
Line 52-63:
<table cellspacing="0">
          <tr>
            <td id="centerCcolumn" colspan="2">

            <!-- Start center-center blocks loop -->
            <{foreach item=block from=$xoops_ccblocks}>
              <{include file="default/theme_blockcenter_c.html"}>
            <{/foreach}>
            <!-- End center-center blocks loop -->

            </td>
          </tr>
The center blocks are all contained in a nested table inside the Center Column (<td id="centercolumn">). The nested table, let’s call it the Center Blocks table as opposed to the Center Column table, has 2 rows.
The first row has one cell (<td id="centerCcolumn" colspan="2">) whose layout is done through the style.css. This row contains the Smarty tags that call the Center-Center blocks through the <{foreach}> Smarty loop tag.
Notice that in include function calls the theme_blockcenter_c.html file. This file dictates the look and layout of the center-center block, specifically how the block title and content are displayed.
Line 64-71
<tr>
            <td id="centerLcolumn">

            <!-- Start center-left blocks loop -->
              <{foreach item=block from=$xoops_clblocks}>
                <{include file="default/theme_blockcenter_l.html"}>
              <{/foreach}>
            <!-- End center-left blocks loop -->
The second row of the Center Blocks table has 2 cells. The first cell contains the Smarty loop that calls on the Center-Left blocks. The cell layout is managed through td style id “centerLcolumn”. As with the center-center blocks, a Smarty include tag calls on a separate file, theme_blockcenter_l.html, for the layout of the center-left blocks.
| Theme-Building Tips |
|---|---|
| |
Line 73-83:
</td><td id="centerRcolumn">

            <!-- Start center-right blocks loop -->
              <{foreach item=block from=$xoops_crblocks}>
                <{include file="default/theme_blockcenter_r.html"}>
              <{/foreach}>
            <!-- End center-right blocks loop -->

            </td>
          </tr>
        </table>
The second cell of the second row of the Center Blocks table contains the Smarty loop that calls on the Center-Right blocks. The cell layout is managed through td style id “centerRcolumn”. As with the center-center blocks, a Smarty include tag calls on a separate file, theme_blockcenter_r.html, for the layout of the center-right blocks.
In summary, the Center Blocks table, which is a nested table, has this basic layout.
| Center-Center Blocks | |
| Center-Left | Center-Right |
| Theme-Building Tips |
|---|---|
| |
Line 88-91:
<div id="content">
          <{$xoops_contents}>
        </div>
      </td>
This short HTML code, a div, is a very important part of the theme. This dictates where your module contents are displayed in relation to the center blocks. The default placement is below the Center Blocks table.
Example of module contents are the news articles in the News Module, the Forum table of the NewBB module, and the Contact Form of the Contact Us Module.
| Theme-Building Tips |
|---|---|
| |
Line 93-106:
<{if $xoops_showrblock == 1}>

      <td id="rightcolumn">
        <!-- Start right blocks loop -->
        <{foreach item=block from=$xoops_rblocks}>
          <{include file="default/theme_blockright.html"}>
        <{/foreach}>
        <!-- End right blocks loop -->
      </td>

      <{/if}>

    </tr>
  </table>
This HTML code displays the Right Blocks. It starts with a conditional: if you have right blocks to show ( <{if $xoops_showrblock == 1}> ), then create a cell for that ( <td id=”rightcolumn”> ), start the Smarty tag loop and include the theme_blockright.html file.
As with the Left Blocks, the included file dictates the layout of the Right Blocks.
| Theme-Building Tips |
|---|---|
| |
Line 108-114:
<table cellspacing="0">
    <tr id="footerbar">
      <td><a href="http://www.xoops.org/" target="_blank"><img
src="<{$xoops_imageurl}>poweredby.gif" alt="" /></a></td>
    </tr>
  </table>
</body>
</html>
The footer table ends the body of the HTML and the theme.html file
| Theme-Building Tips |
|---|---|
| |
| | |
| 1.3. Smarty | Home | 2.2. theme_blockleft.html |