

XOOPS Module Packs Overview- Draft 1
It's time to finalize our Module Packs.
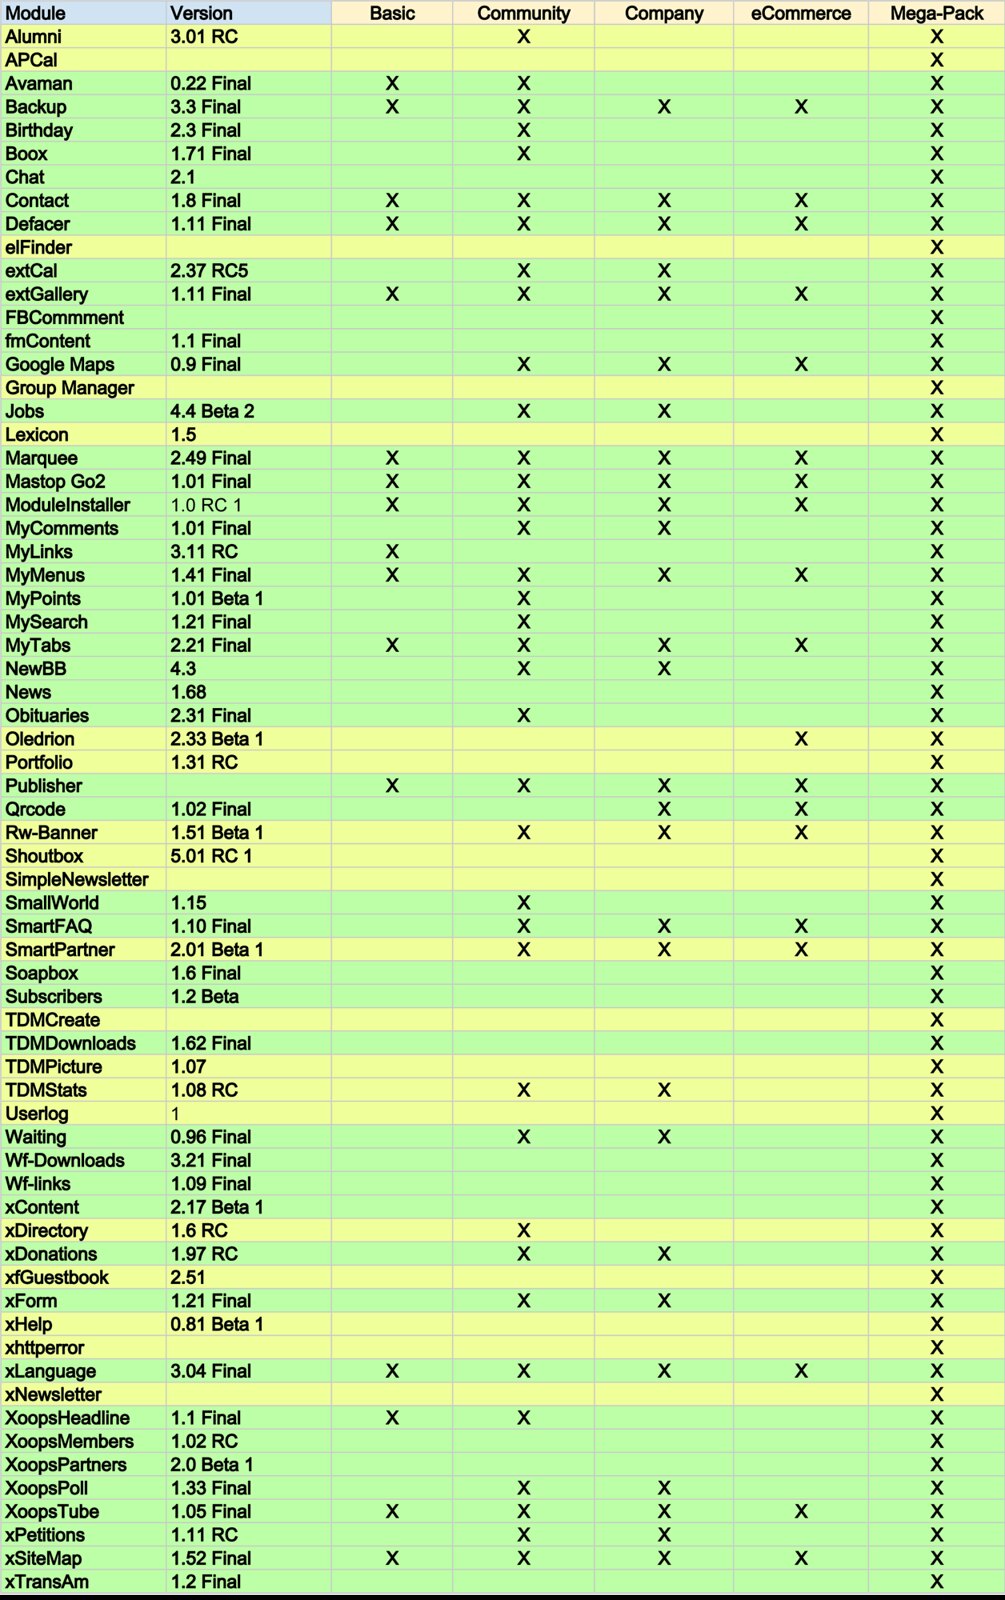
Below is the preliminary list of modules, and their place in the proposed Module Packs:
- Basic
- Community
- Company
- eCommerce
- Mega
The requirements for all these modules are as follow:
- XOOPS 2.5.5 Admin GUI
- active development/maintenance
- tested and working on XOOPS 2.5.5 and under PHP 5.4
In Green, modules that are tested and released.
In Yellow, modules that are still being worked on, and if they're finalized on time, they will be included.
I am sure, that we've missed some modules, or some modules might be duplicate, and should be removed. Some modules might be not in all appropriate Packs.
If you don't know some of these modules, you can find descriptions for most of them in this article, or in the "XOOPS Resource Book"
Please let us know what you think in this thread.
Read more... | 13 comments
Below is the preliminary list of modules, and their place in the proposed Module Packs:
- Basic
- Community
- Company
- eCommerce
- Mega
The requirements for all these modules are as follow:
- XOOPS 2.5.5 Admin GUI
- active development/maintenance
- tested and working on XOOPS 2.5.5 and under PHP 5.4
In Green, modules that are tested and released.
In Yellow, modules that are still being worked on, and if they're finalized on time, they will be included.
I am sure, that we've missed some modules, or some modules might be duplicate, and should be removed. Some modules might be not in all appropriate Packs.
If you don't know some of these modules, you can find descriptions for most of them in this article, or in the "XOOPS Resource Book"
Please let us know what you think in this thread.
Tutorial: How to update tables to follow XOOPS' new naming scheme?
As you might already know, there is an effort to standardize our module development - from using the same module Admin GUI structure, to using the same icons across all modules, from using the same pagination structure for each table, to naming the tables and fields in a consistent way (see this thread).
This tutorial will show you how to modify your module so it can rename the tables on the user site, when the user updates the module. This will follow the scheme suggested by alain01
The new table naming scheme is:
mod_AAA_BBBB
where AAA is the name of the module, and BBB is the name of the table.
For example, when we have in the News module a table called "topics", in the new updated version of News, it will become:
mod_news_topics
Here are few steps to follow, as used recently in the Pedigree module called "animal":
1) The new version should have the tables defined properly in the SQL file, so new installation have the right tables installed right away
2) In the existing installation the users normally copy files over, and then run "update" in the Admin. Therefore we'll need to add a file with the updates. We'll call it "update_function.php" and will place it in /include folder
3) In order for XOOPS to call this file, we'll add in xoops_version.php file following:
4) In that file, we start by adding a function to check if the table that we want to rename, does actually exist. This is done by using a function created by Hervet:
5) then we add a following function that will be executed when we click on the Update button:
In this code above, we are checking if the "eigenaar" does exist, and if it does, then we're renaming it to "mod_pedigree_owner'". Of course, this is done for each table that we want to rename.
6) We also have to rename all occurrences of the tables in the code as well.
a) as a first step, it's easy to just run search & replace using as part of the search the word "prefiix", so in our example, we'll replace:
prefix("eigenaar")
with:
prefix("mod_pedigree_owner")
This is for cases where we call the tables in a conventional way.
b) But people are creative, and it might happen that they do it differently, so nothing will save us from testing, and eventually searching for the word "eigenaar" in all files, and then making a judgment call if it is meant as a table and therefore has to be renamed.
The new naming scheme will make it easier two things:
- to see in phpMyAdmin (or any other database tool) all the tables from a module grouped together. It will also distinguish them from the Core tables.
- in the code it will also make it easy to find the tables just by searching "mod_MODULENAME"
In the near future, we'll also consolidate names and characteristics of the typical fields in our modules, and provide them as guidelines.
When you look at our modules, the same field could be named differently in each module. Let's take "Group ID" - it could be: gid, g_id, group_id, gr_id, etc. And if you are trying to maintain a module from somebody else, we are wasting too much time trying to figure out what a particular field is actually for.
If you have improvements for this tutorial, please let us know.
And most importantly:
- If you can help us to streamline and standardize module development, we would very much appreciate it.
- If you like how a particular module does something and think that other modules should do the same, let us know.
- If you see something cool being done by other Open Source Projects that XOOPS could benefit from, please let us know too.
Please follow up in this thread
Read more... | 4 comments
$modversion['onUpdate'] = 'include/update_function.php';
function tableExists($tablename)

{

    global $xoopsDB;

    $result=$xoopsDB->queryF("SHOW TABLES LIKE '$tablename'");

    return($xoopsDB->getRowsNum($result) > 0);

}
function xoops_module_update_animal()

{

    global $xoopsDB;


    if (tableExists($xoopsDB->prefix('eigenaar'))) {

        $sql    = sprintf(

            'ALTER TABLE ' . $xoopsDB->prefix('eigenaar') . ' RENAME ' . $xoopsDB->prefix('mod_pedigree_owner')

        );

        $result = $xoopsDB->queryF($sql);

        if (!$result) {

            echo '<br />' . _AM_PED_UPGRADEFAILED . ' ' . _AM_PED_UPGRADEFAILED2;

            $errors++;

        }

    }

    return TRUE;

}
Xortify 4.01 (Cloud Client)
Xortify is a network security drone that uses Web 2.0 techniques to link between your XOOPS installs and other via a Server Cloud. This will prevent security intrusions to your xoops with accurate deceptive notation of the intruder and prevent any farmed attacks. It is an accessory and required Protector to be installed an running to be part of the hookup. Otherwise it will run without protector just make sure you deselect protector as a provider.
It will display a template if you are banned and is an accessory to protector or any other firewall technology. The site itself is driven fromhttp://xortify.chronolabs.coop and mirrored athttp://www.xortify.com .. Cloud computing is web 2.0/3.0 stuff it used a SOAP or JSON, XML or Serialisation to exchange on the API backend to work, this will eventually be included in xoops as a support class.
A cloud computing process is one which staggers multiple networks sometime and mainly unknown to the webmaster into a network or cloud of data. In this example it is IP and Netaddy names to control access lists.
This will prevent predators from exposing your network to lag and other attacks from link farming, often this means many xoops are attacked in occasions which is all the time caught by protector, this way if an attack is in process across a large spectrum of links, your site will down itself to your sourced attack even if it is discovered on a completely unaffiliated site that is link farmed to yours or on a XOOPS User list.
Xortify is a cloud solution to protectors Bad IPs, if someone attempts to hack your site and becomes a bad IP it will then send the IP to the Ban Cloud on Xortify.com and its paired cloud Xortify.chronolabs.coop. It will also poll the server to make sure it has the latest ban list so your website will be aware of malusers before they attack through farming IP from services like Google or bing.
Xortify is finally bug free, there was a lasting reminder of how it can be quiet frustrating developing software, especially cloud solutions with so many variables to hone to make sure the system is working, you should enjoy this version and any future releases for XOOPS 2.7, but as it stands I can't find anymore situations, warnings, notices or WSOD with this copy.
Download: https://code.google.com/p/chronolabs2/downloads/detail?name=xoops2_xortify_4.01.zip&can=2&q=#makechanges
Features
* Cloud Server List Propogation - Floating cloud
* Cache Maintenance Cleanup
* Better Ban List
* Better XOOPS 2.5 Module Class GUI
* Greater Ban Diagnostics
* CURL Resolution Timeout
* Fault Locking/Delay
* Performance Extras - fixed
* Cron Job State and Timing
* Pre PHP 5.2 Compatibility
* My IP Information Anti Ban Prevention
* Provider Plugins
* Admin Usage Log
* Protector Module Provider
* Project Honeypot Provider
* Stop Forum Spam Provider
* Spider Module Provide
* XML Polling Protocol
* Serialisation API Protocol
* JSON API Protocol
* SOAP API Protocol
* Anti Spamming with User Signupl
* Anti Harvesting
* Serialisation API Protocol
Installation
Download the lastest version from Chronolabs on Google code or off sourceforge. Unzip the archive you should have a folder called 'htdocs' in the unzipped location. Copy the contents of 'htdocs' folder to your CMS root path this is generally a folder called 'public_html' or 'www' on your FTP service of your website. Log into your CMS and goto the modules/applications installation section, this is generally in your system control area under modules. Click on the icon that represent installing the module. If all has behaved as need be then your module is installed. If your module requires a user licences, keys or a username then sign-up to the apprpriate sites and retreieve your keys or IDs (Links should be provided in the preferences) and paste the values into preferences. Now your right to go!
Upgrading
Download the lastest version from Chronolabs on Google code or off sourceforge. Unzip the archive you should have a folder called 'htdocs' in the unzipped location. Copy the contents of 'htdocs' folder to your CMS root path this is generally a folder called 'public_html' or 'www' on your FTP service of your website. Log into your CMS and goto the modules/applications installation section, this is generally in your system control area under modules. Click on the icon that represent upgrading the module. Your version number should no longer be in bold and would have changed!
Reporting a Bug
The google code section has an area for reporting bugs called issues. Any issue or bug you believe you are having that is not a result of your site services then please report it here. The URL for reporting bugs is as follows:http://code.google.com/p/chronolabs2/issues/entry
Please report the following:
Quote:
Read more... | 5 comments
It will display a template if you are banned and is an accessory to protector or any other firewall technology. The site itself is driven fromhttp://xortify.chronolabs.coop and mirrored athttp://www.xortify.com .. Cloud computing is web 2.0/3.0 stuff it used a SOAP or JSON, XML or Serialisation to exchange on the API backend to work, this will eventually be included in xoops as a support class.
A cloud computing process is one which staggers multiple networks sometime and mainly unknown to the webmaster into a network or cloud of data. In this example it is IP and Netaddy names to control access lists.
This will prevent predators from exposing your network to lag and other attacks from link farming, often this means many xoops are attacked in occasions which is all the time caught by protector, this way if an attack is in process across a large spectrum of links, your site will down itself to your sourced attack even if it is discovered on a completely unaffiliated site that is link farmed to yours or on a XOOPS User list.
Xortify is a cloud solution to protectors Bad IPs, if someone attempts to hack your site and becomes a bad IP it will then send the IP to the Ban Cloud on Xortify.com and its paired cloud Xortify.chronolabs.coop. It will also poll the server to make sure it has the latest ban list so your website will be aware of malusers before they attack through farming IP from services like Google or bing.
Xortify is finally bug free, there was a lasting reminder of how it can be quiet frustrating developing software, especially cloud solutions with so many variables to hone to make sure the system is working, you should enjoy this version and any future releases for XOOPS 2.7, but as it stands I can't find anymore situations, warnings, notices or WSOD with this copy.
Download: https://code.google.com/p/chronolabs2/downloads/detail?name=xoops2_xortify_4.01.zip&can=2&q=#makechanges
Features
* Cloud Server List Propogation - Floating cloud
* Cache Maintenance Cleanup
* Better Ban List
* Better XOOPS 2.5 Module Class GUI
* Greater Ban Diagnostics
* CURL Resolution Timeout
* Fault Locking/Delay
* Performance Extras - fixed
* Cron Job State and Timing
* Pre PHP 5.2 Compatibility
* My IP Information Anti Ban Prevention
* Provider Plugins
* Admin Usage Log
* Protector Module Provider
* Project Honeypot Provider
* Stop Forum Spam Provider
* Spider Module Provide
* XML Polling Protocol
* Serialisation API Protocol
* JSON API Protocol
* SOAP API Protocol
* Anti Spamming with User Signupl
* Anti Harvesting
* Serialisation API Protocol
Installation
Download the lastest version from Chronolabs on Google code or off sourceforge. Unzip the archive you should have a folder called 'htdocs' in the unzipped location. Copy the contents of 'htdocs' folder to your CMS root path this is generally a folder called 'public_html' or 'www' on your FTP service of your website. Log into your CMS and goto the modules/applications installation section, this is generally in your system control area under modules. Click on the icon that represent installing the module. If all has behaved as need be then your module is installed. If your module requires a user licences, keys or a username then sign-up to the apprpriate sites and retreieve your keys or IDs (Links should be provided in the preferences) and paste the values into preferences. Now your right to go!
Upgrading
Download the lastest version from Chronolabs on Google code or off sourceforge. Unzip the archive you should have a folder called 'htdocs' in the unzipped location. Copy the contents of 'htdocs' folder to your CMS root path this is generally a folder called 'public_html' or 'www' on your FTP service of your website. Log into your CMS and goto the modules/applications installation section, this is generally in your system control area under modules. Click on the icon that represent upgrading the module. Your version number should no longer be in bold and would have changed!
Reporting a Bug
The google code section has an area for reporting bugs called issues. Any issue or bug you believe you are having that is not a result of your site services then please report it here. The URL for reporting bugs is as follows:http://code.google.com/p/chronolabs2/issues/entry
Please report the following:
Quote:
a) Version of CMS
b) Version of PHP
c) Version of MySQL
d) Services Software ie. Apache, Zeus etc.
e) Version of Software
f) Error Messages
g) Steps to reproduce
e) Contact details for the team to get in touch should they need!
X-REST API 1.60 -Rest API with SOAP, JSON, XML & Serial Response
X-REST 1.60 is a REST API for XOOPS 2.x series. It will work with earlier version of xoops as well upto XOOPS 2.5. It provides a full REST API with JSON, XML and Serialisation Responses. It uses the standard plugin set for the other APIs as well as this one to provide a streamlined solution to APIs on your site.
The plugins are not compatible with all other API by chronolabs. You may be familar with a REST api such as the ones at Google, Twitter, Facebook etc, this is just the same but allowing for API Action on your own website.
There is two reserved variables on the REST API which are the following: xrestplugin & outputmode.
Download: xoops2_xrest_1.60.zip – 133Kb
New Features Include:
Some Features Include:
System Requirements:
Example Calls:
[size=xx-small] * JSON:http://example.com/modules/xrest/tweet/json/?username=name&password=1750f40030c6b07cd9f7a482a10593d9&tweet=this+the+tweet&channel=sydney
* XML:http://example.com/modules/xrest/tweet/xml/?username=name&password=1750f40030c6b07cd9f7a482a10593d9&tweet=this+the+tweet&channel=sydney
* SERIALIZATION:http://example.com/modules/xrest/tweet/serial/?username=name&password=1750f40030c6b07cd9f7a482a10593d9&tweet=this+the+tweet&channel=sydney
* SOAP:http://example.com/modules/xrest/tweet/soap/?
Passed by Soap Function Call [username=name; password=1750f40030c6b07cd9f7a482a10593d9; tweet=this+the+tweet;channel=sydney ]
[/size]
Changelog:
[size=xx-small]======================================
== 2013/03/03 17:12:23 Version 1.60 STABLE ==
======================================
- Changed /class/plugin.php Testing of plugins with eval() removed (Wishcraft)
- Changed /class/plugin.php Extension testing added to getFileListAsArray() (Wishcraft)
- Changed /include/server.php Preloaders added to main service bootstrapping (Wishcraft)
- Changed /include/server.php Execution Mode added to support SOAP + WSDL (Wishcraft)
- Changed /include/server.php parse_url() & parse_str() added to variable scoop for accuracy (Wishcraft)
- Changed /plugin/tweet.php tweet_xsd() renamed to tweet_xsd_soap() & tweet_xsd_rest() (Wishcraft)
- Changed /plugin/tweet.php tweet_wsdl_documentation() added (Wishcraft)
- Added /xxxx/*.* Commenting added to main functional routines (Wishcraft)
[/size]
Video:
*/
Comments?
The plugins are not compatible with all other API by chronolabs. You may be familar with a REST api such as the ones at Google, Twitter, Facebook etc, this is just the same but allowing for API Action on your own website.
There is two reserved variables on the REST API which are the following: xrestplugin & outputmode.
Download: xoops2_xrest_1.60.zip – 133Kb
New Features Include:
- SOAP API (With WSDL)
Some Features Include:
- REST JSON API
- REST XML API
- REST SERIALIZATION API
- SOAP API (With WSDL)
- Database Access permissioning (Needs to be implemented in plugin)
- XOOPS User Permissions
- XOOPS Group Permissions
- Universal Plugin Set
System Requirements:
- XOOPS 2.5.x
Example Calls:
[size=xx-small] * JSON:http://example.com/modules/xrest/tweet/json/?username=name&password=1750f40030c6b07cd9f7a482a10593d9&tweet=this+the+tweet&channel=sydney
* XML:http://example.com/modules/xrest/tweet/xml/?username=name&password=1750f40030c6b07cd9f7a482a10593d9&tweet=this+the+tweet&channel=sydney
* SERIALIZATION:http://example.com/modules/xrest/tweet/serial/?username=name&password=1750f40030c6b07cd9f7a482a10593d9&tweet=this+the+tweet&channel=sydney
* SOAP:http://example.com/modules/xrest/tweet/soap/?
Passed by Soap Function Call [username=name; password=1750f40030c6b07cd9f7a482a10593d9; tweet=this+the+tweet;channel=sydney ]
[/size]
Changelog:
[size=xx-small]======================================
== 2013/03/03 17:12:23 Version 1.60 STABLE ==
======================================
- Changed /class/plugin.php Testing of plugins with eval() removed (Wishcraft)
- Changed /class/plugin.php Extension testing added to getFileListAsArray() (Wishcraft)
- Changed /include/server.php Preloaders added to main service bootstrapping (Wishcraft)
- Changed /include/server.php Execution Mode added to support SOAP + WSDL (Wishcraft)
- Changed /include/server.php parse_url() & parse_str() added to variable scoop for accuracy (Wishcraft)
- Changed /plugin/tweet.php tweet_xsd() renamed to tweet_xsd_soap() & tweet_xsd_rest() (Wishcraft)
- Changed /plugin/tweet.php tweet_wsdl_documentation() added (Wishcraft)
- Added /xxxx/*.* Commenting added to main functional routines (Wishcraft)
[/size]
Video:
IP Log 1.02 - Capture and Store you Users IP Addresses
IP Log 1.02 is a module for XOOPS 2.5 and later which allows your XOOPS install to capture and store the IP address and locational information for Users that have logged in for a period of time until they are dropped.
It uses www.IPInfoDB.com to get the location of the IP Address as well as storing how many seconds they spent online. It is an admin module only it has no Main User Interface. You will have to get an API Key from this site by registering and authenticating your email address, this is at no charge to you!
Download: xoops2.5_iplog_1.02.zip - 402Kb
Features:
Change Log:
[size=xx-small]================================================
== Version 1.02 Final - 2013/03/03 12:45 AEST ==
================================================
Changed: /include/function.php - iplog_getIP made to use XoopsUserUtility::getIP(true) (wishcraft)
[/size]
Video Demo:
Comments?
It uses www.IPInfoDB.com to get the location of the IP Address as well as storing how many seconds they spent online. It is an admin module only it has no Main User Interface. You will have to get an API Key from this site by registering and authenticating your email address, this is at no charge to you!
Download: xoops2.5_iplog_1.02.zip - 402Kb
Features:
- XOOPS 2.5 Gui
- Dashboard
- About Us
- Preloader
- Timer
- Easy to use
Change Log:
[size=xx-small]================================================
== Version 1.02 Final - 2013/03/03 12:45 AEST ==
================================================
Changed: /include/function.php - iplog_getIP made to use XoopsUserUtility::getIP(true) (wishcraft)
[/size]
Video Demo:
SpeechSearch V1.0
SpeechSearch adds a search block to XOOPS which can accept input using the Web Speech API included in Google Chrome as of version 25. On compatible systems, the block will include a microphone icon which will launch the speech recognition, and send the results to the standard system search routines. On systems that don't support the API, it will quietly degrade to mimic the normal system search block.
The Google recognizer handles a wide variety of languages and dialects which you can choose in the block editor. In addition to the cool toy appeal, this has significant accessibility enhancement potential. There are even greater potentials when this API makes its way into the mobile browsers.
Download the SpeechSearch module here: http://geekwright.com/modules/wfdownloads/singlefile.php?lid=6
Read more... | 4 comments
The Google recognizer handles a wide variety of languages and dialects which you can choose in the block editor. In addition to the cool toy appeal, this has significant accessibility enhancement potential. There are even greater potentials when this API makes its way into the mobile browsers.
Download the SpeechSearch module here: http://geekwright.com/modules/wfdownloads/singlefile.php?lid=6
Userlog: a new module to log user activities
Currently we dont know anything about all activities in our websites done by users, visitors and robots.
Yes. Protector is a module to log malicious activities but you don't have any control on what should be logged and what shouldn't.
This is very limited for a webmaster in a large community website.
More trouble will come when you have 10 admins and 50 moderators in your crowded community website and some contents are deleted/edited/changed and no one know who did it.
Here I introduce a brand new module "Userlog" to solve the above issue and much more.
With this module you can log anything from as minor as a user IP to whole activities like all request methods like GET/POST.
Here is a brief description of userlog you can find in the help section after install:
Quote:
Also this module is coming with a brand new feature:
Quote:
Please not: this is the first Alpha version
It means you should only use it in test environments and there will not be any upgrade for the next versions.
Also it means you may expect huge changes in files and database structure.
Requirements:
=========================
XOOPS 2.5.5 php 5.3 mysql 5.0
To Install
=========================
1- upload the userlog to /modules/userlog (upload the compressed file and decompressed via Cpanel is the best way to insure all files are correctly uploaded)
2- go to your admin -> system -> modules -> install
3- change the default settings to your desired in the module preferences
discussion:
https://xoops.org/modules/newbb/viewtopic.php?topic_id=75865
download:
Transifex : Userlog 1.0 Alpha 1 (language files for translators).
Sourceforge : Userlog 1.0 Alpha 1
svn: http://svn.code.sf.net/p/xoops/svn/XoopsModules/userlog/trunk/
Read more... | 10 comments
Yes. Protector is a module to log malicious activities but you don't have any control on what should be logged and what shouldn't.
This is very limited for a webmaster in a large community website.
More trouble will come when you have 10 admins and 50 moderators in your crowded community website and some contents are deleted/edited/changed and no one know who did it.
Here I introduce a brand new module "Userlog" to solve the above issue and much more.
With this module you can log anything from as minor as a user IP to whole activities like all request methods like GET/POST.
Here is a brief description of userlog you can find in the help section after install:
Quote:
Userlog is a node logger which can log your user/visitor activities in your site.
This is a very useful tool for webmasters in busy sites. for example you can log your other admins navigation.
current nodes for logging are: user id, user group and visitor ip.
Also this module is coming with a brand new feature:
Quote:
Many XOOPS users have a wish for a block to see most viewed items in a module or in the whole website in a specific period of time.
for example in news module we just have a most viewed block that shows forever views.
Now with userlog module this wish is covered completly. you have many options in this block. go yourself and play to see.
Please not: this is the first Alpha version
It means you should only use it in test environments and there will not be any upgrade for the next versions.
Also it means you may expect huge changes in files and database structure.
Requirements:
=========================
XOOPS 2.5.5 php 5.3 mysql 5.0
To Install
=========================
1- upload the userlog to /modules/userlog (upload the compressed file and decompressed via Cpanel is the best way to insure all files are correctly uploaded)
2- go to your admin -> system -> modules -> install
3- change the default settings to your desired in the module preferences
discussion:
https://xoops.org/modules/newbb/viewtopic.php?topic_id=75865
download:
Transifex : Userlog 1.0 Alpha 1 (language files for translators).
Sourceforge : Userlog 1.0 Alpha 1
svn: http://svn.code.sf.net/p/xoops/svn/XoopsModules/userlog/trunk/
New Frameworks: WideImage_for_xoops
Here is a Frameworks for managing images. Frameworks that is based on PHP class WIDEimage and has been optimized for Xoops.
Version: 1.01
Minimum requirements
Read more... | 3 comments
- PHP 5.2 or 5.3
- GD2 library
Features
- Loading Images
- Save images
- Adds noise to the image
- Allocate a color by RGB values
- Applies convolution matrix
- Applies a filter
- grayscale copy of the image
- a negative of the image
- Performs an auto-crop on the image
- Corrects gamma on the image
- Returns a cropped rectangular portion of the image
- flipped (mirrored over horizontal line) copy of the image
- Retrieve an image with selected channels
- A method lays the overlay (watermark) on the image
- Returns a mirrored copy of the image
- Resize the image to given dimensions.
- Resizes the canvas of the image
- Rotate the image
- Returns an image with round corners
Tutorial: New design for block comments, step by step
 I would like share with you my experience with a new style of news:
a step by step tutorial. In this edition, I will show you how to modify the comments block. The default design of this block is pretty old, so let's bring small but smart design changes to make the display more useful.
Please let's see an exemple here (Not xoops web site).
First, you should understand how overloaded theme work (surcharge du thème)
The best tutorial for this is this one on XOOPS France (in French).
We will start step by step in order to explain to you how it is possible, and in the end, you should practice these changes with another block.
I will invite you to upload the files step by step, so it would be more clear for you.
So, now, let's gooooooo !!!
I would like share with you my experience with a new style of news:
a step by step tutorial. In this edition, I will show you how to modify the comments block. The default design of this block is pretty old, so let's bring small but smart design changes to make the display more useful.
Please let's see an exemple here (Not xoops web site).
First, you should understand how overloaded theme work (surcharge du thème)
The best tutorial for this is this one on XOOPS France (in French).
We will start step by step in order to explain to you how it is possible, and in the end, you should practice these changes with another block.
I will invite you to upload the files step by step, so it would be more clear for you.
So, now, let's gooooooo !!!
 We need :
- Template files comments from the system module
- CSS file from your theme (style.css)
1 - Template files comments to the overloaded theme
Copy the files /www/modules/system/templates/system_comment*.html to /www/themes/mytheme/modules/system
- system_comment.html
- system_comments_flat.html
- system_comments_net.html
- system_comments_thread.html
2 - Customization
We need :
- Template files comments from the system module
- CSS file from your theme (style.css)
1 - Template files comments to the overloaded theme
Copy the files /www/modules/system/templates/system_comment*.html to /www/themes/mytheme/modules/system
- system_comment.html
- system_comments_flat.html
- system_comments_net.html
- system_comments_thread.html
2 - Customization
 2a Head
Now, we work on the files on /www/themes/mytheme/modules/system
We start to delete the top head
Edit the 3 files system_comments_*.html and comment this out (or delete this) :
2a Head
Now, we work on the files on /www/themes/mytheme/modules/system
We start to delete the top head
Edit the 3 files system_comments_*.html and comment this out (or delete this) :
<!--

<tr>

    <th class="width20"><{$lang_poster}></th>

    <th><{$lang_thread}></th>

  </tr>

-->
 2b - Delete poster's info - keep only avatar
Now, all changes will be in the system_comment.html file (for the next one too)
Delete information from user :
- Rank
- Registry date
- Localisation
- Contribution number
- Status
Just keep avatar
2b - Delete poster's info - keep only avatar
Now, all changes will be in the system_comment.html file (for the next one too)
Delete information from user :
- Rank
- Registry date
- Localisation
- Contribution number
- Status
Just keep avatar
<div class="comUserRank">

    <div class="comUserRankText"><{$comment.poster.rank_title}></div>

    <img class="comUserRankImg" src="<{$xoops_upload_url}>/<{$comment.poster.rank_image}>" alt="" />

</div>

<img class="comUserImg" src="<{$xoops_upload_url}>/<{$comment.poster.avatar}>" alt="" />

<div class="comUserStat"><span class="comUserStatCaption"><{$lang_joined}>:</span> <{$comment.poster.regdate}></div>

<div class="comUserStat"><span class="comUserStatCaption"><{$lang_from}>:</span> <{$comment.poster.from}></div>

<div class="comUserStat"><span class="comUserStatCaption"><{$lang_posts}>:</span> <{$comment.poster.postnum}></div>

<div class="comUserStatus"><{$comment.poster.status}></div>
<img class="comUserImg" src="<{$xoops_upload_url}>/<{$comment.poster.avatar}>" alt="" />
 2c - Move poster' name , date and style
Let's simplify the display comment date:
So, replace
2c - Move poster' name , date and style
Let's simplify the display comment date:
So, replace
<tr>
<td class="head"><a id="comment<{$comment.id}>"></a> <{$comment.poster.uname}></td>
<td class="head"><div class="comDate"><span class="comDateCaption"><{$lang_posted}>:</span> <{$comment.date_posted}> <span class="comDateCaption"><{$lang_updated}>:</span> <{$comment.date_modified}></div></td>
</tr>
<tr>

          <td><a id="comment<{$comment.id}>"></a></td>

          <td><{$comment.poster.uname}> said the <{$comment.date_posted}> (<{$lang_updated}>: <{$comment.date_modified}>)</td>

        </tr>
 2d - Same Date comments and modification comments ?
We don't want to see the date twice, if it's the same date, so replace the previous code by
2d - Same Date comments and modification comments ?
We don't want to see the date twice, if it's the same date, so replace the previous code by
<tr>

    <td><a id="comment<{$comment.id}>"></a></td>

    <td><{$comment.poster.uname}> said the <{$comment.date_posted}>

        <{if $comment.date_posted != $comment.date_modified}>

            (modified the <{$comment.date_modified}>)

        <{/if}>

    </td>

</tr>
 2e - Move buttons to the top
Now, we want to move the buttons on the top.
First, take the test code of poster, at the bottom file, and delete all lines with < td > et < /td >.
So the partial code seems to be this now, with right style CSS :
2e - Move buttons to the top
Now, we want to move the buttons on the top.
First, take the test code of poster, at the bottom file, and delete all lines with < td > et < /td >.
So the partial code seems to be this now, with right style CSS :
<div style="float:right;">

<{if $xoops_iscommentadmin == true}>

    <a href="<{$editcomment_link}>&com_id=<{$comment.id}>" title="<{$lang_edit}>"><img src="<{$xoops_url}>/images/icons/edit.gif" alt="<{$lang_edit}>" /></a>

    <a href="<{$deletecomment_link}>&com_id=<{$comment.id}>" title="<{$lang_delete}>"><img src="<{$xoops_url}>/images/icons/delete.gif" alt="<{$lang_delete}>" /></a>

    <a href="<{$replycomment_link}>&com_id=<{$comment.id}>" title="<{$lang_reply}>"><img src="<{$xoops_url}>/images/icons/reply.gif" alt="<{$lang_reply}>" /></a>

<{elseif $xoops_isuser == true && $xoops_userid == $comment.poster.id}>

    <a href="<{$editcomment_link}>&com_id=<{$comment.id}>" title="<{$lang_edit}>"><img src="<{$xoops_url}>/images/icons/edit.gif" alt="<{$lang_edit}>" /></a>

    <a href="<{$replycomment_link}>&com_id=<{$comment.id}>" title="<{$lang_reply}>"><img src="<{$xoops_url}>/images/icons/reply.gif" alt="<{$lang_reply}>" /></a>

<{elseif $xoops_isuser == true || $anon_canpost == true}>

        <a href="<{$replycomment_link}>&com_id=<{$comment.id}>"><img src="<{$xoops_url}>/images/icons/reply.gif" alt="<{$lang_reply}>" /></a>

<{/if}>

</div>
 2f - Style
- Delete title and picture title :
Delete line
2f - Style
- Delete title and picture title :
Delete line
<div class="comTitle"><{$comment.image}><{$comment.title}></div>
<td style="width:120px;"><a id="comment<{$comment.id}>"></a></td>
<td style="text-align:center;">

                    <img class="comUserImg" src="<{$xoops_upload_url}>/<{$comment.poster.avatar}>" alt="" />

                </td>
 2g - Add an arrow
We need to work on the style.css file, in the mytheme theme to create this arrow in CSS.
For my theme, it is in /www/themes/mytheme/css/style.css
Add this code in style.css :
2g - Add an arrow
We need to work on the style.css file, in the mytheme theme to create this arrow in CSS.
For my theme, it is in /www/themes/mytheme/css/style.css
Add this code in style.css :
.arrow-left {

width: 0px;

height: 0px;

border-style: solid;

border-width: 25px 20px 25px 0;

border-color: transparent #ECE9D8 transparent transparent;

}
<td></td>
<td style="width:120px;"><a id="comment<{$comment.id}>"></a></td>
<td></td>
<td class="odd"><div class="comText"><{$comment.text}></div></td>
<div class="arrow-left"></div>
<td style="width:20px;"><div class="arrow-left"></div></td>
2f - Style
Add 2 break lines for cleared diplay. Put it just before the name poster.
<td><br /><br /><{$comment.poster.uname}>
<!-- start comment post -->

        <tr>

            <td style="width:120px;"><a id="comment<{$comment.id}>"></a></td>

            <td></td>

            <td><br /><br /><{$comment.poster.uname}> a dit le <{$comment.date_posted}>

                    <{if $comment.date_posted != $comment.date_modified}>

                        (modifié le <{$comment.date_modified}>)

                    <{/if}>

                    <div style="float:right;">

                        <{if $xoops_iscommentadmin == true}>

                            <a href="<{$editcomment_link}>&com_id=<{$comment.id}>" title="<{$lang_edit}>"><img src="<{$xoops_url}>/images/icons/edit.gif" alt="<{$lang_edit}>" /></a>

                            <a href="<{$deletecomment_link}>&com_id=<{$comment.id}>" title="<{$lang_delete}>"><img src="<{$xoops_url}>/images/icons/delete.gif" alt="<{$lang_delete}>" /></a>

                            <a href="<{$replycomment_link}>&com_id=<{$comment.id}>" title="<{$lang_reply}>"><img src="<{$xoops_url}>/images/icons/reply.gif" alt="<{$lang_reply}>" /></a>

                        <{elseif $xoops_isuser == true && $xoops_userid == $comment.poster.id}>

                            <a href="<{$editcomment_link}>&com_id=<{$comment.id}>" title="<{$lang_edit}>"><img src="<{$xoops_url}>/images/icons/edit.gif" alt="<{$lang_edit}>" /></a>

                            <a href="<{$replycomment_link}>&com_id=<{$comment.id}>" title="<{$lang_reply}>"><img src="<{$xoops_url}>/images/icons/reply.gif" alt="<{$lang_reply}>" /></a>

                        <{elseif $xoops_isuser == true || $anon_canpost == true}>

                            <a href="<{$replycomment_link}>&com_id=<{$comment.id}>"><img src="<{$xoops_url}>/images/icons/reply.gif" alt="<{$lang_reply}>" /></a>

                        <{/if}>

                    </div>

            </td>

        </tr>


        <tr>

            <{if $comment.poster.id != 0}>

                <td style="text-align:center;">

                    <img class="comUserImg" src="<{$xoops_upload_url}>/<{$comment.poster.avatar}>" alt="" />

                </td>

            <{else}>

                <td class="odd"> </td>

            <{/if}>

                <td style="width:20px;"><div class="arrow-left"></div></td>

                <td class="odd">

                    <div class="comText"><{$comment.text}></div>

                </td>

        </tr>

 <tr><td></td><td></td><td></td></tr>

<!-- end comment post -->

D-Transport, new module by Xoops Mexico

I've recently released D-Transport 2.0 Beta for XOOPS, based on Common Utilities.
With D-Transport you can create a downloads section in XOOPS, with new and cool features that make the files management very easy and efficient.
This module contains a lot of features such as:
✔ Friendly URLs support. Very easy to configure.
✔ Multiple files by download item.
✔ Supports screenshots for items.
✔ A features manager.
✔ Statistics for items activity.
✔ Integrate with rmcommon features.
✔ Alerts for inactivity for items.
✔ and more...
You can see the module in action in the downloads section of Xoops Mexico (note that this is not a demo).
Download the module.
You can post your feedback, questions and comments in this forum.
Login
Search
Recent Comments
Who's Online
Donat-O-Meter
| Stats | |
| Goal: | $100.00 |
| Due Date: | May 31 |
| Gross Amount: | $0.00 |
| Net Balance: | $0.00 |
| Left to go: | $100.00 |
| |
|
Latest GitHub Commits
Archives
News archives
- January 2017
- November 2016
- October 2016
- September 2016
- August 2016
- July 2016
- June 2016
- May 2016
- April 2016
- March 2016
- February 2016
- January 2016
- December 2015
- November 2015
- October 2015
- September 2015
- July 2015
- May 2015
- April 2015
- March 2015
- February 2015
- January 2015
- December 2014
- November 2014
- October 2014
- September 2014
- August 2014
- July 2014
- June 2014
- May 2014
- April 2014
- March 2014
- February 2014
- January 2014
- December 2013
- November 2013
- October 2013
- September 2013
- August 2013
- July 2013
- June 2013
- May 2013
- April 2013
- March 2013
- February 2013
- January 2013
- December 2012
- November 2012
- October 2012
- September 2012
- August 2012
- July 2012
- June 2012
- May 2012
- April 2012
- March 2012
- February 2012
- January 2012
- December 2011
- November 2011
- October 2011
- September 2011
- August 2011
- July 2011
- June 2011
- May 2011
- April 2011
- March 2011
- February 2011
- January 2011
- December 2010
- November 2010
- October 2010
- September 2010
- August 2010
- July 2010
- June 2010
- May 2010
- April 2010
- March 2010
- February 2010
- January 2010
- December 2009
- November 2009
- October 2009
- September 2009
- August 2009
- July 2009
- June 2009
- May 2009
- April 2009
- March 2009
- February 2009
- January 2009
- December 2008
- November 2008
- October 2008
- September 2008
- August 2008
- July 2008
- June 2008
- May 2008
- April 2008
- March 2008
- February 2008
- January 2008
- December 2007
- November 2007
- October 2007
- September 2007
- August 2007
- July 2007
- June 2007
- May 2007
- April 2007
- March 2007
- February 2007
- January 2007
- December 2006
- November 2006
- October 2006
- September 2006
- August 2006
- July 2006
- June 2006
- May 2006
- April 2006
- March 2006
- February 2006
- January 2006
- December 2005
- November 2005
- October 2005
- September 2005
- August 2005
- July 2005
- June 2005
- May 2005
- April 2005
- March 2005
- February 2005
- January 2005
- December 2004
- November 2004
- October 2004
- September 2004
- August 2004
- July 2004
- June 2004
- May 2004
- April 2004
- March 2004
- February 2004
- January 2004
- December 2003
- November 2003
- October 2003
- September 2003
- August 2003
- July 2003
- June 2003
- May 2003
- April 2003
- March 2003
- February 2003
- January 2003
- December 2002
- November 2002
- October 2002
- September 2002
- August 2002
- July 2002
- June 2002
- May 2002
- April 2002
- March 2002
- February 2002
- January 2002
- December 2001
- December 1969