| Chapter 4. General configuration | ||
|---|---|---|
   | ||
| Chapter 4. General configuration | ||
|---|---|---|
| ||
Over the first hurdle
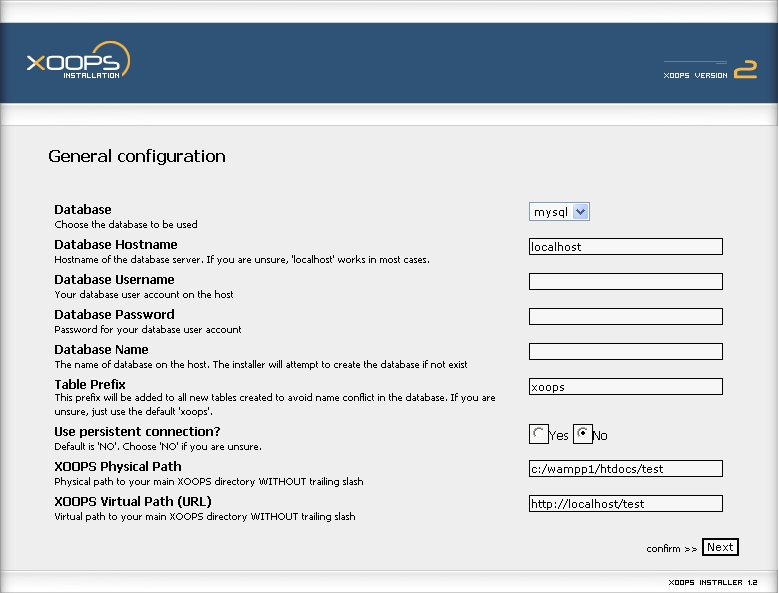
The time has come to start configuring our soon-to-exist XOOPS site. Since you already have your folder permissions correct, it's time to give the wizard information about you, beginning with the user with rights over the database and then following with some general information. This is the screen you see now:
The first selector is for the moment a reminder that XOOPS looks into the future, as now there's only support for MySQL databases. So you don't choose at all. If you don't see the mysql option, then something weird is happening. I'd advise you to re-upload you the full package before attempting to do anything else. You should see there the option even if you have no power over it. Ok?
Next comes the database host name, that is, the name of the host of the MySQL database server. It already reads localhost, and chances are that's all you'll ever need. Leave it as it is.
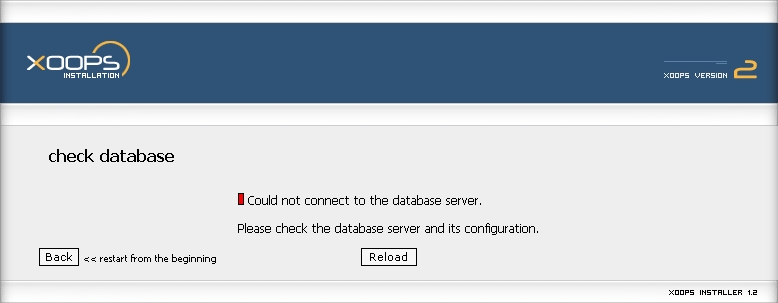
What happens if you write here something different? The wizard will let you continue your installation, but some steps ahead you'll find yourself stopped with the following screen:
Now jump to the database user name. Remember what you read back in the Introduction part? Yes: it's time to use that knowledge. If you're installing locally, you probably are using the user called root, so that would be the name to write in this field. If you're a more experienced MySQL user, maybe you have different users with different access levels. If that's the case, fill the blank with the name of the user you created to handle your XOOPS database. If you're installing in a remote hosted server, you most surely had to create the database before the installation, so you already got a user name. Put in this field that name.
Next comes the password that user will employ to access the XOOPS tables. Again, if you're installing locally, you know the password you use to access MySQL, and if you're installing in a remote server, you also have the password you input when defining the database. This is the place to write it.
In the following field you define the name of your XOOPS database. Use a name that makes sense to you, more so if you install locally and have a lot of sites running together. You might want to try short names, though, because XOOPS will prefix each name with the string contained in the next field, "Table Prefix". Of course you can change the prefix used in your tables, but be sure to remember it afterwards. The recommended option is to leave it as it is. Although the field says xoops, actually the prefix added to every table is xoops_, with an underscore at the end.
Next comes a Yes/No question about using persistent connections in your MySQL database. The default option is No, and there's reasons for that. I won't detail more here, but if you want a more lucid explanation, there's a very good one here: "MySQL Newsletter Using persistent connections with MySQL". My advice? Leave it at No.
Then come two ways of referring to your soon-to-be XOOPS site: the physical path, that is, the folder structure pointing to the directory where you installed everything, and the virtual path, that is, the URL you'll use to access your site. As you can see in the screenshot, taken from a WAMP environment, the physical path is c:/wampp1/htdocs/test, which means the software was installed in a directory called test. In a UNIX environment, this usually amounts to the document root, which, for a typical installation, reads something like /home/yoursite/public_html. Be sure to write the path without trailing slash, so you can reach your destinations
If you write the wrong path to your XOOPS site, the wizard will be smart enough to tell something is amiss. This is what you'll eventually see, and you can readily see there's a typo in the name written in the path field: instead of ending with test it ends with tess:
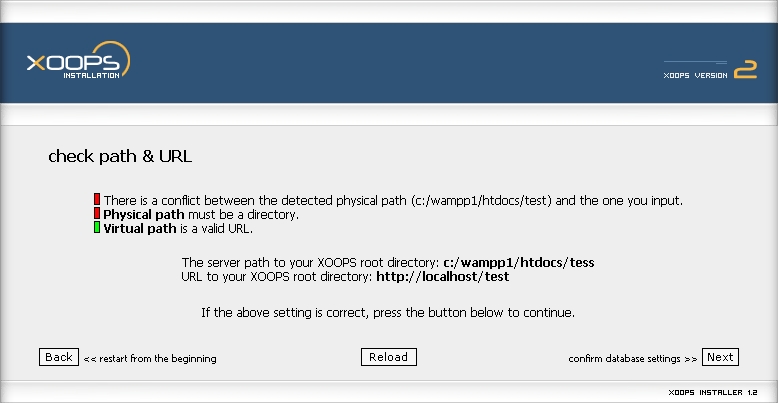
Figure 4.3. Beep! You've misspelled the path to your XOOPS installation. You better go back and correct it
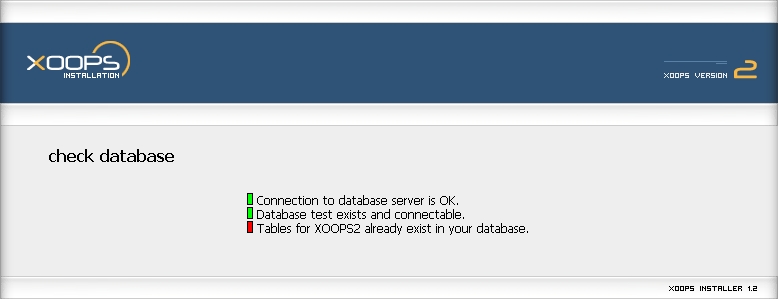
If you proceed without correcting stuff, you might end up seeing another strange screen:
In this screen you see a message indicating you already have the XOOPS tables written. What happened here? You went ahead with some mistake, created the tables and then restarted the process in the wizard, when the tables were already set. If you ever get to this point, you'll have to literally start over. That means using your database tool of choice (probably MySQLadmin) to drop the tables and start all over. See why it's important to have always green lights during your installation?
Anyway. Next comes the URL and that should be very easy to fill. If you're installing locally and copied the XOOPS software to the folder xoops, the URL will be http://localhost/xoops. See? No trailing slash. If you add a slash at the end, your paths will lead nowhere and you'll ruin your installation, so no trailing slash. Ok?
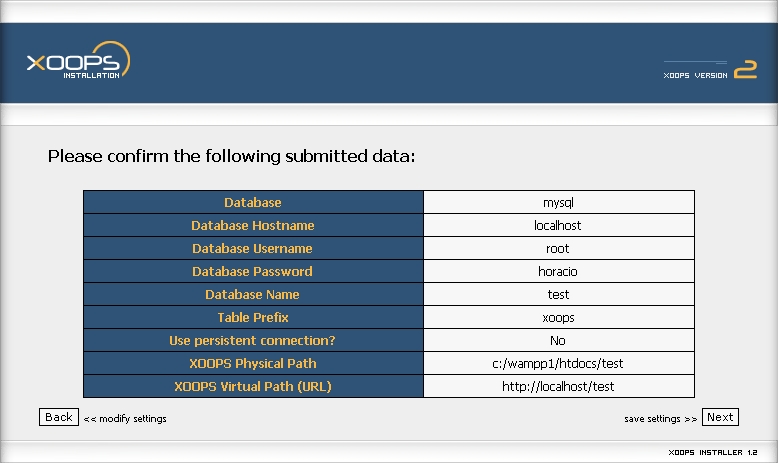
Very well. Now you've filled all the fields and are ready to continue. What to do? Just press the button labeled . This will take you to a simple confirmation screen that'll repeat the values you entered so you have a chance to correct them before committing them. This is the confirmation screen you'll see:
Once you read carefully the values you entered, click again on the button . This action will show you an informational screen that looks like this:
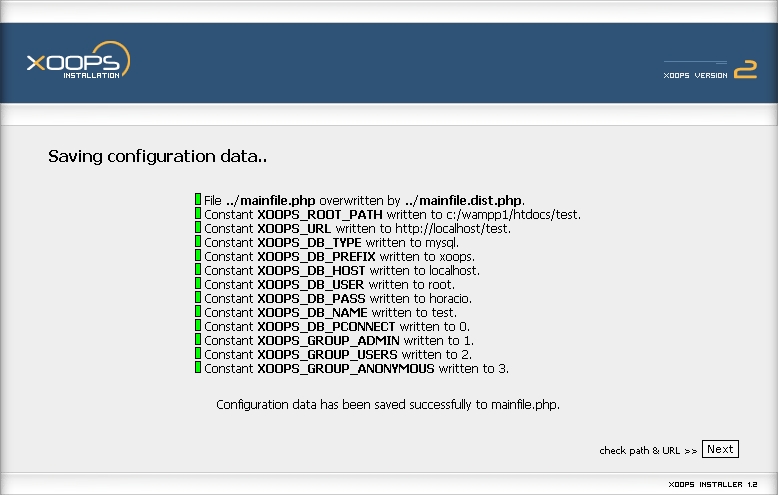
Let's pause a bit here to see what happened. First, the wizard took the file mainfile.dist.php and copied it over mainfile.php. What for? To have a correctly structures configuration file. If you take a look at mainfile.dist.php, you'll see it contains a lot of variable assignments, though the values are generic ones. Now the file is ready for XOOPS to write the actual values, taken from... you guessed it: from the page you just filled with values.
The value you entered in XOOPS Physical Path is assigned to the variable XOOPS_ROOT_PATH.
The value you entered in XOOPS Virtual Path (URL) is assigned to the variable XOOPS_URL.
The value you, er, entered in Database is assigned to the variable XOOPS_DB_TYPE.
The value you entered (or left) in Table Prefix is assigned to the variable XOOPS_DB_PREFIX.
The value you entered in Database Hostname is assigned to the variable XOOPS_DB_HOST.
The value you entered in Database Username is assigned to the variable XOOPS_DB_USER.
The value you entered in Database Password is assigned to the variable XOOPS_DB_PASS.
The value you entered in Database Name is assigned to the variable XOOPS_DB_NAME.
The value you chose in Use persistent connection? (where Yes = 1 and No = 0) is assigned to the variable XOOPS_DB_PCONNECT.
The wizard assigned, arbitrarily, the value 1 to indicate the users group called by the variable XOOPS_GROUP_ADMIN (webmasters).
The wizard assigned, arbitrarily, the value 2 to indicate the users group called by the variable XOOPS_GROUP_USERS (registered users).
The wizard assigned, arbitrarily, the value 3 to indicate the users group called by the variable XOOPS_GROUP_ANONYMOUS (anonymous users).
And all these values or assignments were written to the file mainfile.php, as you'll be able to see when you finish the installation. as you can notice, these aren't peanuts: these values define the access to your database and the paths used to access your site. Fail in this and you won't find things where they should be. Do this correctly and XOOPS will manage things for you easily.
If all you see is a nice battery of green lights, you're ready to continue by clicking on the button named . And to continue with this manual, let's go to Chapter 5, Path and URL.
| | |
| Chapter 3. Folder permissions | Home | Chapter 5. Path and URL |